
 Welcome to the VentSim home page.
About VentSim
VentSim is a fully functioning, high fidelity, physiologically faithful mechanical ventilator simulator. It was developed by Dr. Roger Stedman for iOS using the Swift programming language. Its purpose is an educational tool for critical care doctors, nurses, therapists, and anaesthetists – essentially anyone that has an interest in the provision of safe, effective care of the mechanically ventilated patient.
VentSim uses a mathematical model of the human respiratory system (volumes, resistance and compliance) which are well established models published in the literature [https://www.physiology.org/doi/pdf/10.1152/jappl.1998.84.1.389]. These have been codified with an interface developed which allows you to manipulate parameters to simulate different patient scenarios (everything from a neonate through to an adult with severe COPD and emphysema).
VentSim allows you to apply ventilator settings to your respiratory system model and then generates pressure, volume and flow signals that are displayed on your iOS device.
Using VentSim
On launch VentSim takes you straight into the simulator view – this is your central navigation point for the app.

VentSim View on an iPhone 8 plus
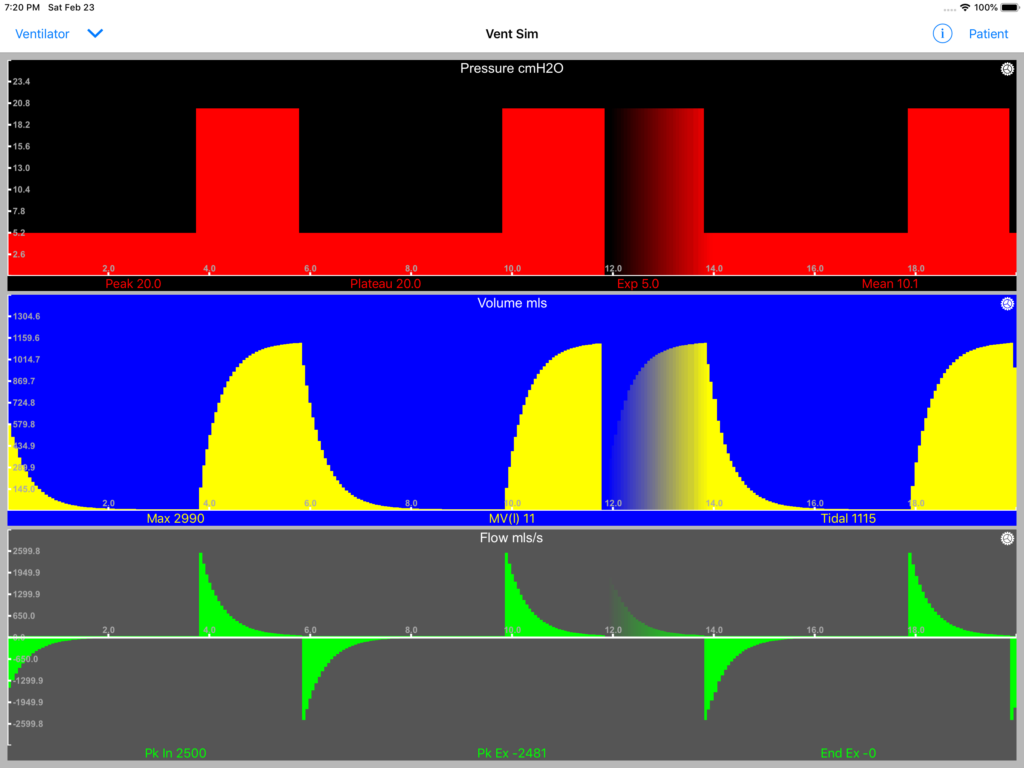
VentSim View on an iPad (more space!)
The default simulation is pressure control ventilation 20/5 cmH2O at a rate of 10bpm and an I:E ratio of 1:2 on a normal adult compliance 75mls/cmH2O and no airflow obstruction.
Set up your simulated patient
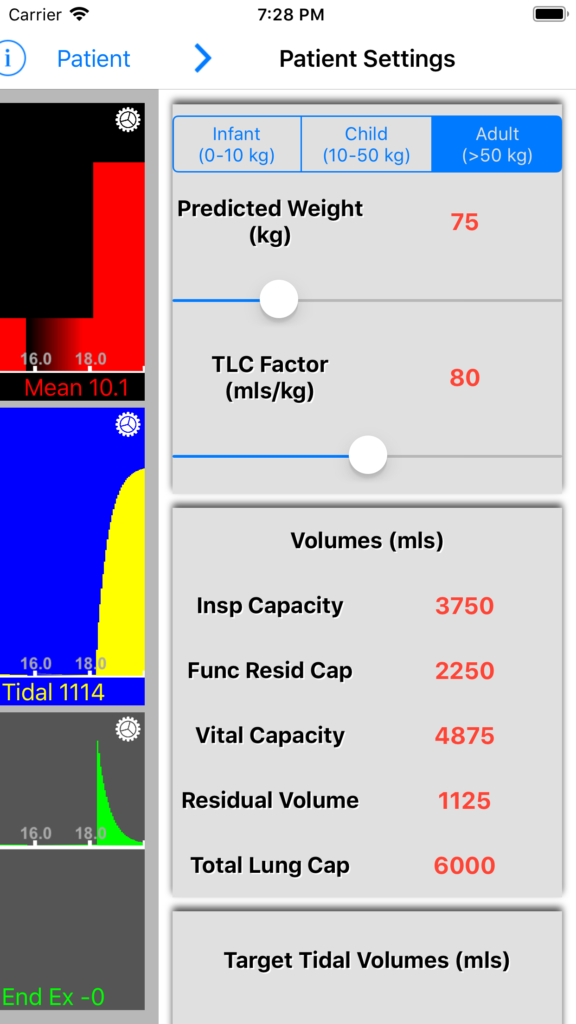
Tap the ‘Patient’ button on the right side of the navigator bar. This brings up the ‘Patient Settings’ view:
The controls will slide in from the right, allowing you to still see some of the simulator view as you make adjustments. How much you see will depend on your screen size and orientation.
For now leave the segmented control on ‘Linear Compliance Model’ – whilst a linear compliance model is less physiologically faithful than the full dynamic model it is still sufficient to demonstrate general principles.
Adjust the ‘Compliance Slider’ (mls/cmH2O) – the description indicates what the compliance you have selected would represent in a normal subject according to their size. The number represents the volume the lung will adopt (once equilibrated) for a given airway pressure.
Adjust the ‘Resistance Slider’ – (cmH20/l/s) – the description indicates what that airway resistance would represent for an adult. The number represents the pressure required to generate a flow of 1 l/s in the airway. This is the resistive component of airway pressure. note that children and infants generally have higher airway resistance than adults (resistance is correlated to size) so for example in a neonate normal airway resistance would be considered ‘moderate obstruction’ in an adult.
You can with this version select the ‘Dynamic Compliance’ segmented control – however in this mode it defaults to normal adult settings and the compliance slider is disabled. Dynamic compliance modelling is coming soon…! (see below)
Return to the simulator view by tapping the right arrow in the navigator bar.
Adjust your ventilator settings
Select the ‘Ventilator’ button to the left of the navigator bar. This brings up the ‘Ventilator Settings’ view:

Again the view will slide from the left, leaving the simulator partially visible. Note also the ventilator controls can be scrolled up and down if the screen height is insufficient to show them all.
Select your ventilator rate (bpm) and I:E ratio using the sliders. You have a choice of three ventilator modes; Pressure Control, Volume Control and Flow Control. You are able to adjust appropriate input values for each of these (Inspiratory pressure, tidal volume or inspiratory flow) as well as apply PEEP and in volume control mode add an end inspiratory pause.
Return to the simulator view to view the impact your settings have had on your patients respiratory parameters.
Optimise the simulator view
If you are finding that due to screen size information is hidden (as is the case with the iPhone SE) try turning your device on its side into landscape mode.

The simulator view in landscape mode on an iPhone SE
Each simulator graph view has a gear icon in the top right hand corner, tap this to bring up the view settings panel. This allows you to change the background color, plot color, speed of animation, animation type (default is the wrap fade mode) and plot style (line or solid).

Graph Plot View settings popover
You will notice that as you change your settings the graph plots will automatically re-scale to an optimum screen fit. The axis labels will adjust accordingly. The panel data is updated at the end of each respiratory cycle.
Other Features
The ‘i’ (information) button on the navigator bar opens a mini-browser which navigates automatically to this page.
The down pointing chevron button on the navigator opens a menu with which to access other features of the simulator which are…
Coming Soon!
The ability to save and load settings.
P/V, F/V and P/F loops in addition to the time based graph plots.
Dynamic compliance modelling – allowing the simulation of a vast range of pathological scenarios, more realistic physiological responses a deeper understanding of the fascinating world of respiratory physiology.

Dynamic compliance modelling is a more precise and realistic physiological model. You can model hysteresis and modify inflection points as well as model the impact of volume limits etc.
Privacy Statement
VentSim collects no data from its users other than counting the number of hits on this website. Any data saved by the app – such as simulation scenarios are stored on the users device and remain there.
Any use of this product in research and or teaching is free to the user – please acknowledge authorship:
Dr Roger Stedman, Consultant Anaesthesia and Critical Care Medicine, Great Western Hospitals NHS Foundation trust
and send me an email describing how you have used it, any bug reports and any suggestions for improvements and/or further developments to:

Recent Comments